register gallery
 

Go Back   Mazdaspeed Forums >
MAZDASPEED SECTION
>
Mazdaspeed 3/6 MZR Gen1 Forums (2006-2009)
> MazdaSpeed 6 - Engine, Transmission & Driveline
Garage Calendar Forum Rules Today's Posts Search


Welcome to Mazdaspeed Forums .

You are currently viewing our boards as a guest which gives you limited access to view most discussions and access our other features. By joining our free community you will have access to post topics, communicate privately with other members (PM), respond to polls, upload content and access many other special features. Registration is fast, simple and absolutely free so please, join our community today!

If you have any problems with the registration process or your account login, please contact contact us.

*When you join MSF as a registered user, there will be No Ads.

*Registered Members get access to the Off Topic Area of the Forum

*Registered Members have an opportunity to upgrade their accounts to VIP, which brings a host of goddies for supporting MSF such as Raffles, Additional Forum Access, More PM Storage, The ability to upload more Images and many other enhancements.

*Registered members also get access to the live chat box!
Reply
 
Bookmark and Share LinkBack Thread Tools Search this Thread Display Modes
 Old 12-28-2011, 09:06 AM   #1
 
tkephart's Avatar
 
Join Date: May 2011
Posts: 18   (View Stats)
iTrader: (0)
Rep Power: 0
tkephart is a splendid one to beholdtkephart is a splendid one to beholdtkephart is a splendid one to beholdtkephart is a splendid one to beholdtkephart is a splendid one to beholdtkephart is a splendid one to beholdtkephart is a splendid one to behold
Thanks: 5
Thanked 15 Times in 6 Posts
Groans: 0
Groaned at 0 Times in 0 Posts
(Thread Starter)
Not Ranked  0 score     
Default VVT Fix Notes and Observations

I figured since I had used these message boards to help me out of a couple jams, I should contribute some of my notes and observations regarding my VVT replacement.

First off, I highly recommend the Shop manual or subscribing to ALLDATAdiy.com Leading Source of Factory Automotive Repair Information that has the Speed 6 workshop manual broken down into sections describing procedures, specs and part numbers needed. I found that it was very helpful in filling in the gaps as well as torque specs and the like.

I will have to apologize that I did not take more pictures, I was under somewhat of a time constraint and had to get it done in two days or I was sol for a couple weeks. Having said that, if this is your first time into your engine, it will take a while to check and double check your work. Also figuring out the little details takes a little time and should not be taken lightly.

You should only attempt this if you have a decent garage with a set of air tools, floor jack, jack stands and lots of light.

I would consider myself mechanically inclined but a novice to serious car maintaince such as this. I used chimmike's post/ as a step by step in conjunction with the workshop manual to fill in the details. I am going to repost his tsep by step with my notes added.

BE SURE TO STUDY THE FSM MECHANICAL SECTION PRIOR TO DOING THIS!
  1. Jack up the car, support on stands
  2. Remove battery, intake, TIP
  3. Remove camshaft driven fuel pump
    The pump has a hard line connected to the bottom that you will need to remove prior to removing the whole pump
  4. Remove CDFP housing from head (4 bolts, pulls off end of intake camshaft) don't be shy about disconnecting wiring and moving out of the way.
    There are a bunch of connectors, wires and brackets that you should remove/move to easily access the pump
  5. Remove all ignition coils and any items bolted to top of valve cover
  6. remove valve cover
  7. Remove passenger wheel and splash guard
    I would recommend having a supply of extra rivets because the rivets used to hold the splash guard on tend to be a pain in the ass to remove and you end up just ripping them out
  8. Locate tensioner pulley, turn in direction indicated in Mechanical section of FSM to loosen tension; remove drive belt
    A long breaker bar and a friend are helpful here. The belt in my case was pretty tight and required full activation of the tensioner to remove the belt.
  9. Remove spark plugs (this is to release compression, make it easier to spin the crank)
  10. Look to the left of the crank pulley, on the back of the block is a 12mm or 10mm bolt, almost directly facing the axle. This is a plug, remove and place the crankshaft SST
    Example of the SST This will stop the crankshaft from rotating at TDC. Be aware thought that it will not prevent the crankshaft from rotating off of TDC backwards. You might need to remove the crankshaft position sensor to access this plug.
  11. Use 21mm socket, rotate crankshaft clockwise SLOWLY until it stops, reaching TDC for cylinder 1.
  12. Look at intake and exhaust cams. They should be facing eachother in an upward angle of approximately 45* (someone correct me if I'm wrong please!)
    This is correct, 45 facing eachother
  13. Use 21mm again and impact gun, loosen crank pulley bolt (Or use crank pulley SST and pry bar, but good luck with that)
    Impact gun is the best here. If you try to use a breaker bar or ratchet, you will be disappointed and frustrated. The impact gun will only remove the crank pulley bolt and should not turn the crakshaft away from TDC in the process.
  14. Remove crankshaft pulley
    This was a little tricky as the shape of the pulley made it a little difficult to setup a puller to remove the pulley. BE CAREFUL IF YOU ARE TRY TO PRY IT OFF TO NOT BEND OR BREAK THE TEETH ON THE INSIDE OF THE CRANKSHAFT PULLEY! Also be careful to not drop the crankshaft pulley as it comes off.
  15. Access idler pulley, use pry bar to hold in place and loosen bolt (easy enough)
    This might be done easier with the motor mounts off. I was able to put a wrench on it and turn it 360. The bolt is really long and takes a while
  16. Access water pump pulley (3 bolts), lock in place with pry bar and loosen/remove
    I found a large file braced against two of the bolts allowed me to remove the free bolt. A friend or an extra set of hands helps here.
  17. Loosen and remove power steering pump from front of motor, top right of timing cover
    Three bolts, two top and one underneath. Simple enough
  18. Loosen/remove all 8mm bolts on timing cover, use care not to remove 8mm bolts next to some that hold on the water pump
    I highly recommend looking at the specifications in the manual when removing these bolts. There is a torquing pattern recommended when you put the cover back on. I numbered the bolts as I took them out. There are one or two bolts that do not hold the cover in place that are smaller than the rest.
  19. Place floorjack under oil pan with 2x4 or 4x4 on top to spread weight, jack up and support motor.
  20. Move power steering and coolant reservoirs out of the way
  21. use 17mm socket and air ratchet, remove passenger motor mount from motor and frame, do not be surprised if motor moves during this process.
    As with most things, caution is not a bad thing here. You are not jacking up the motor, but rather just supporting the motor. Be careful when removing the motor mount bolts. If you have too much pressure from the support jack, the engine will move as your remove the bolts. Reassess and make sure that you are only supporting and not jacking up the engine
  22. Remove 3 12mm bolts below the two studs holding the upper middle of timing cover to block
  23. Make sure ALL bolts (including 8mm and 13mm bolts) are removed from timing cover
  24. Make sure you know where these bolts return to! Some are VERY specific
  25. Use pry bar and GENTLY begin to pry timing cover off block, working your way around slowly, pull timing cover up and out
    There is a bunch of silicone sealant on this cover. Make sure that you have removed all 22 screws holding the plate on before you start prying. Once you get it started, it should be easy to peal off.
  26. Now is the time to prep: Scrape all sealant off edges of timing cover and block, spray NON-Chlorinated brake cleaner ONTO A RAG, NOT THE MOTOR, and wipe the machined surfaces clean
  27. Follow FSM instructions for removal of chain tensioner
    Fairly straightforward. My tensioner was fully extended so there wasnt very hard to remove it. Watch your fingers if there is still a significant amount of tension.
  28. Remove intake cam caps in order described in FSM, SLOWLY and IN STEPS
  29. Remove your intake cam, bishes, and follow FSM steps for removal and replacement of VVT Actuator
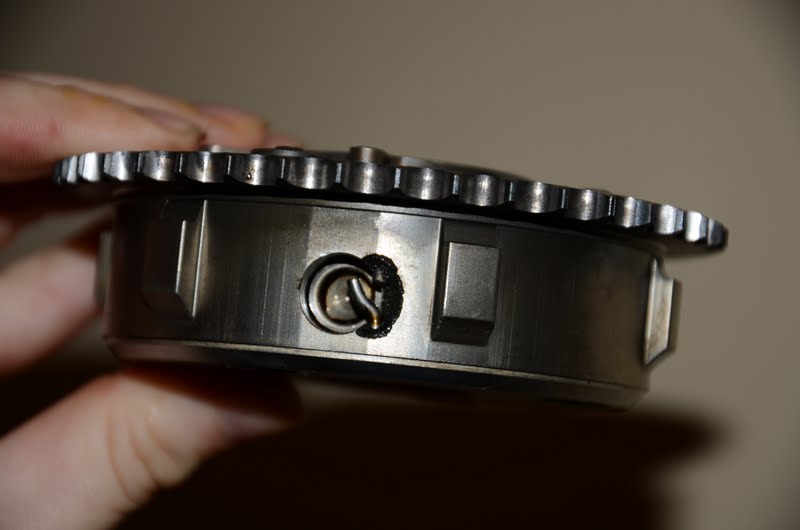
    I didnt remove the intake cam. Rather, I removed the chain and removed the bad VVT (pictures below). With the timing chain off, I installed the Cam Alignment SST and set my timing. My cams were about 5-10 degrees off. With the SST, they were religned. Make sure that you note the orientation of your old VVT when removing it. There is a specific orientation that you must take into account when you install your new VVT. There are holes in the camshaft that you must align with your VVT. As I understand it, this allows oil to enter the VVT and is critical to function. As will all of these bolts, torque to spec
  30. Replace cam in motor with lobes of cyl 1 facing same way they were prior to removal, or at a 45* upward, facing towards back of car (CYLINDER 1 LOBES)
    TDC cylinder 1 cam position should have intake and exhaust cams facing each other at 45 degrees.
  31. Utilize Camshaft SST Plate as described in FSM to set cams in proper location
  32. Use adjustable wrench to secure exhaust cam, use 21mm box wrench to loosen exhaust cam bolt enough to allow cam sprocket to spin
    I replaced my chain as well. You loosen the exhaust cam sprocket to take up slack between the exhaust sprocket and the VVT. Make sure that the chain is tight between these two sprockets.
  33. Reinstall chain tensioner as described in FSM
    The new tensioner should be almost fully retracted. This means that all of that slack that was in the chain is no longer there. Good thing!
  34. Make sure chain is on guides!
  35. Release pin from tensioner allowing full tension
  36. Do not be alarmed if exhaust cam sprocket spins when this happens
  37. check chain tension, ratchet tensioner out a notch if you want
  38. Using old crank pulley bolt, install crankshaft pulley
  39. Reinstall intake cam caps, torque down as described in FSM procedure!
  40. Secure exhaust cam in place via adjustable wrench and torque down exhaust cam sprocket bolt per FSM specs
  41. Remove Camshaft SST and crankshaft SST plug
  42. Spin crankshaft in clockwise motion to verify no valve interference. If crank stops firmly, don't force it, that's valve interference!
    This shouldnt be a problem if you have done everything correct up to this point
  43. Place crankshaft SST plug back in place, spin crank slowly clockwise to reach TDC for cyl 1 again.
  44. Use impact gun to zip off old crank pulley bolt
  45. If no issues, your timing is good!
  46. Discard old crank pulley bolt, you won't need it anymore.
  47. Reinstall timing cover and seal per FSM guidelines/torque
    Make sure that you follow the torquing pattern described in the shop manual. You will also need to apply a bead of silicone sealant around the cover in specified areas.
  48. Reinstall crankshaft pulley and torque following FSM instructions closely
    I bent my alignment SST when I was torquing the crankshaft pulley so be careful.
  49. Install crankshaft position sensor (20th tooth middle should line up with middle of notch on sensor, check FSM to verify)
    IMPORTANT STEP!! The crank pulley has teeth around the outside. These teeth are used by the crank position sensor to do what else, sense the crank position for firing sequence. If this is not set properly, as I did the first time, your car wont start and you will start to think that you should have taken it to the dealer. I installed the crank position sensor at the lowest adjustment point. The crank position sensor has slots for minor adjustments. Make sure that you are as far down as you can be. There will be a tooth that is marked with a white dash on the crank pulley to indicate TDC cylinder 1 location. This is the 20th tooth counterclockwise from the gap in teeth. Verify this by checking the shop manual. Carefully align the 20th tooth with the middle line on the crank position sensor and carefully tap the crank pulley back onto the crank shaft. Take care to keep the 20th tooth aligned with the crank position sensor. Once you have the crank pulley on, torque to spec. The pulley may rotate clockwise and this is why we put the crank position sensor at the bottom position, so that we could adjust up/clockwise if needed.
  50. Reinstall idler pulley and water pump pulleys
  51. Reinstall CDFP housing
  52. Reinstall Power Steering pump
  53. Reinstall passenger motor mount
  54. reinstal CDFP
  55. reinstall coolant and power steering reservoirs
  56. Reinstall valve cover, sealing as necessary per FSM
    There is a torquing pattern and spec that should be followed here as well
  57. Complete reinstallation of all accessories and lines, connectors, etc. etc. etc.
  58. BE SURE TO DOUBLE AND TRIPLE CHECK YOUR WORK!

The original step-by-step by chimmike was definitely helpful and it would have been very difficult to do without it. Make sure to reference each step in the shop manual as there is valuable information as well as confirmation of the steps listed above.

Here is a picture of my broken VVT

Oh and she sounds fantastic now, more more diesel like grinding as I start my engine. I dont know if it is just a placebo but it feels much more responsive now with no hesitation.

If you have the garage, time, an extra set of hands, and the shop manual, you should be able to replace the VVT.
tkephart is offline   Reply With Quote
The Following 10 Users Say Thank You to tkephart For This Useful Post:
06Speed6 (12-28-2011), Dano (12-28-2011), djuosnteisn (01-09-2012), jracer (12-28-2011), NinjaT1985 (12-28-2011), psychophyr (12-28-2011), speedms6 (12-28-2011), TiGraySpeed6 (12-28-2011), TWOptSL0W (12-28-2011), zpele (12-28-2011)
 Old 12-28-2011, 09:09 AM   #2
 
NinjaT1985's Avatar
 
Join Date: May 2011
Location: Richmond, VA
Posts: 551   (View Stats)
iTrader: (0)
Rep Power: 0
NinjaT1985 is the leader of the worldNinjaT1985 is the leader of the worldNinjaT1985 is the leader of the worldNinjaT1985 is the leader of the worldNinjaT1985 is the leader of the worldNinjaT1985 is the leader of the worldNinjaT1985 is the leader of the worldNinjaT1985 is the leader of the worldNinjaT1985 is the leader of the worldNinjaT1985 is the leader of the worldNinjaT1985 is the leader of the world
Thanks: 336
Thanked 281 Times in 131 Posts
Groans: 3
Groaned at 33 Times in 10 Posts
Not Ranked  0 score     
Default

I hope this problem is only with genwons...
__________________
2012 Toyota Tacoma
NinjaT1985 is offline   Reply With Quote
 Old 12-28-2011, 09:50 AM   #3
 
Rokusek's Avatar
 
Join Date: May 2011
Location: Virginia Beach, Virginia
Posts: 5,551   (View Stats)
iTrader: (7)
Rep Power: 3957
Rokusek is the leader of the worldRokusek is the leader of the worldRokusek is the leader of the worldRokusek is the leader of the worldRokusek is the leader of the worldRokusek is the leader of the worldRokusek is the leader of the worldRokusek is the leader of the worldRokusek is the leader of the worldRokusek is the leader of the worldRokusek is the leader of the world
Thanks: 9,694
Thanked 7,594 Times in 2,498 Posts
Groans: 101
Groaned at 50 Times in 41 Posts
Not Ranked  0 score     
Default

now if you only had pictures, thats where i keep failing, im trying to get the How-To with pictures and things to keep in mind put together.

Glad you got through it and made it happen!!! congrats bro, shit was not easy lol
__________________
I'm not back... But help me find SOMETHING


Originally Posted by Raider View Post
The only guy here getting away with giving his car a name...
Daily: Evelyn (Eve), 04 4Motion 6Speed VW Passat W8
Sold to @yourstruly; : Isabella (Izzy), 06 MS6 GT with Navigation #1271
Sold to @downmented; : Audrey, 95 Miata
Totaled: Vivian (Viv), 07 MS3 bolted and built, brutally murdered by a texting driver
Rokusek is offline   Reply With Quote
 Old 12-28-2011, 10:01 AM   #4
 
jracer's Avatar
 
Join Date: May 2009
Location: Clw/ NPR Florida
Posts: 1,706   (View Stats)
iTrader: (1)
Rep Power: 0
jracer is the leader of the worldjracer is the leader of the worldjracer is the leader of the worldjracer is the leader of the worldjracer is the leader of the worldjracer is the leader of the worldjracer is the leader of the worldjracer is the leader of the worldjracer is the leader of the worldjracer is the leader of the worldjracer is the leader of the world
Thanks: 10,516
Thanked 2,917 Times in 657 Posts
Groans: 89
Groaned at 17 Times in 10 Posts
Not Ranked  0 score     
Default

good write up ! one thing i think you forgot was the 3 friction washers should be replaced when doing this job .
__________________
[SIGPIC][/SIGPIC]
2013 EVO X GSR Wicked White w/Areo
H&R springs/H&R 15mm spacers
MAP modified 3" Magna Flow cat back
MAP catless testpipe
MAP UICP
Grimmspeed 3 port
Cosworth filter
SSP relay kit
TWM Desert Eagle shift knob
AEM wideband gauge
Prosport boost gauge
EvoX piller pod
30%Tint
Slowpoke Tuned 339hp/336tq


**** SOLD *****
2006 speed6


" A woman's asshole is like a 9-volt battery..U know its wrong, but sooner or later ur gonna put ur tongue on it !! "
jracer is offline   Reply With Quote
The Following User Says Thank You to jracer For This Useful Post:
Dano (12-28-2011)
 Old 12-28-2011, 10:06 AM   #5
Trail of Fail
 
Dano's Avatar
 
Join Date: Jan 2010
Location: rock city AR
Posts: 9,484   (View Stats)
iTrader: (2)
Rep Power: 9906
Dano is the leader of the worldDano is the leader of the worldDano is the leader of the worldDano is the leader of the worldDano is the leader of the worldDano is the leader of the worldDano is the leader of the worldDano is the leader of the worldDano is the leader of the worldDano is the leader of the worldDano is the leader of the world
Thanks: 10,493
Thanked 19,250 Times in 6,532 Posts
Groans: 37
Groaned at 25 Times in 22 Posts
Not Ranked  0 score     
Default

Originally Posted by jracer View Post
good write up ! one thing i think you forgot was the 3 friction washers should be replaced when doing this job .
absolutely and without fail...the FSM will indicate this and prab why OP kept referencing the manual.
__________________


07 Red MS3 GT - E40 - Carrillo Rods - Wiseco Pistons - BSD - JBR 3.5 WidePath - ATP GTX3071 - Forge BPV - GA - Cobb v2 FMIC - CPE EM - CPE DP - CNT CBE - APv3 - Grim EBC - PERM dual port PCV plate - Dano dual OCC - CPE CDFP - Labonte S2 WMI - ACT Street Kit - SUv2 RMM - SU TM - "Stiffy" MM - DG CF wing ext, skirts & front lip - Hotchkis RSB/FSB w PowerGrid Links - Koni FSDs - DBA SX4000 Rotors - Hawk Pads - Silver OZ Ultraleggera - 235/40/18 NT-01
Dano is offline   Reply With Quote
 Old 12-28-2011, 10:10 AM   #6
 
TiGraySpeed6's Avatar
 
Join Date: Jun 2009
Location: Tally, FL
Posts: 3,981   (View Stats)
iTrader: (1)
Rep Power: 3058
TiGraySpeed6 is the leader of the worldTiGraySpeed6 is the leader of the worldTiGraySpeed6 is the leader of the worldTiGraySpeed6 is the leader of the worldTiGraySpeed6 is the leader of the worldTiGraySpeed6 is the leader of the worldTiGraySpeed6 is the leader of the worldTiGraySpeed6 is the leader of the worldTiGraySpeed6 is the leader of the worldTiGraySpeed6 is the leader of the worldTiGraySpeed6 is the leader of the world
Thanks: 4,683
Thanked 5,754 Times in 2,278 Posts
Groans: 2
Groaned at 3 Times in 3 Posts
Not Ranked  0 score     
Default

bookmarking this one!
for my '06 speed6 it's only a matter of time, and at just about 60,000 miles, not much time left either I suspect......

Respectable post for a noob brownie!
__________________
Was a Mazdaspeed6 GT #3476 TiGray slicktop
Now in a BMW 135i - double the turbos, double the fun!
E82.N54 2009 / BSM / A/T / Drop-in / PR CP / Berk Street / MHD / xHP
340hp / 371tq
TiGraySpeed6 is offline   Reply With Quote
 Old 12-28-2011, 10:16 AM   #7
Speeeeeed

 
06Speed6's Avatar
 
Join Date: Mar 2008
Location: Corpus Christi, Tx
Posts: 6,530   (View Stats)
iTrader: (24)
Rep Power: 7490
06Speed6 is the leader of the world06Speed6 is the leader of the world06Speed6 is the leader of the world06Speed6 is the leader of the world06Speed6 is the leader of the world06Speed6 is the leader of the world06Speed6 is the leader of the world06Speed6 is the leader of the world06Speed6 is the leader of the world06Speed6 is the leader of the world06Speed6 is the leader of the world
Thanks: 6,190
Thanked 14,562 Times in 2,807 Posts
Groans: 41
Groaned at 23 Times in 19 Posts
Not Ranked  0 score     
Default

4 washers...

Nice 2nd post, if only everyone could make a 2nd post this good.
__________________
2006 Mazdaspeed 6

P&P, flow benched, head with welded EGR and +1mm inconel exhaust valves (260/200cfm @ .500"), Web Cams, Custom crankcase breather with integrated air/oil seperator, Custom 3/4" ID pan vac system, Blow through maf, Port matched IM, CNC AN-12 ORB block oil adapter, CP-e 88mm Stage 2 pistons, Pauter 22.5mm rods, ARP main, head, and crank studs, CP-e injector seals, Injector stud kit, Cometec 88mm 5 layer HG, Deatschworks flow tested matched injectors, DCR VVT, PTP 2250psi RV, Corksport front sway, Whiteline rear sway, AWR front/rear sway links, TT FMM, AWR 70d DMM, JBR 80D PMM, SU RMM, TT FRDM, CP-e RRDM, Autotech CDFP, DW65c ITFP, Custom L/A IC with a dual pass 20x25x1.5 heat exchanger, Dual Cobra I/C pumps, 2.5" ID 700hp I/A intercooler, Custom DP, Corksport catback, Corksport exhaust hangers, chrome plated genpu valve cover, chrome plated timing cover, Spin on oil filter, Fluidyne dual pass AN-12 oil cooler, Hayden oil cooler fan controller, Dual 4.7" SPAL oil cooler fans, Canton Racing 22-480 oil tstat, Custom BMRS AN-12 oil lines, SPC ball joints, 55w/35w headlights and independently switched fogs on custom waterproof harnesses, PIAA Super Plasma driving and interior lights, rear diff cutout switch, 3M clear front cover, Volk 17x7.5 wheels, Custom tcase bearing cap upgrade, GS EBC 3 port, Redline SS hood lift, Versatune, Defi gauges, Innovate MTX-L WB gauge, triple center gauge pod, Block8head dual vent pod, Redline shift boot & ebrake cover & arm rest cover, Mazdaspeed CF ebrake handle, SBC Full Face Feramic Clutch Disc, Dashawk, ACL rod bearings, King main bearings, Cosworth BSD, Custom windage tray, Holset HX35w, Creative Performance T3 EWG manifold, HKS VTA BOV, A1 H11 head studs, Hylomar HG sealant, SSP EGR delete plate, JBR EGR IM plug, JGS 40mm Race EWG


06Speed6 is offline   Reply With Quote
The Following User Says Thank You to 06Speed6 For This Useful Post:
jracer (12-28-2011)
 Old 12-28-2011, 11:21 AM   #8
 
Rokusek's Avatar
 
Join Date: May 2011
Location: Virginia Beach, Virginia
Posts: 5,551   (View Stats)
iTrader: (7)
Rep Power: 3957
Rokusek is the leader of the worldRokusek is the leader of the worldRokusek is the leader of the worldRokusek is the leader of the worldRokusek is the leader of the worldRokusek is the leader of the worldRokusek is the leader of the worldRokusek is the leader of the worldRokusek is the leader of the worldRokusek is the leader of the worldRokusek is the leader of the world
Thanks: 9,694
Thanked 7,594 Times in 2,498 Posts
Groans: 101
Groaned at 50 Times in 41 Posts
Not Ranked  0 score     
Default

Originally Posted by 06Speed6 View Post
Nice 2nd post, if only everyone could make a 2nd post this good.
Indeed

+1
__________________
I'm not back... But help me find SOMETHING


Originally Posted by Raider View Post
The only guy here getting away with giving his car a name...
Daily: Evelyn (Eve), 04 4Motion 6Speed VW Passat W8
Sold to @yourstruly; : Isabella (Izzy), 06 MS6 GT with Navigation #1271
Sold to @downmented; : Audrey, 95 Miata
Totaled: Vivian (Viv), 07 MS3 bolted and built, brutally murdered by a texting driver
Rokusek is offline   Reply With Quote
 Old 12-28-2011, 11:29 AM   #9
 
tkephart's Avatar
 
Join Date: May 2011
Posts: 18   (View Stats)
iTrader: (0)
Rep Power: 0
tkephart is a splendid one to beholdtkephart is a splendid one to beholdtkephart is a splendid one to beholdtkephart is a splendid one to beholdtkephart is a splendid one to beholdtkephart is a splendid one to beholdtkephart is a splendid one to behold
Thanks: 5
Thanked 15 Times in 6 Posts
Groans: 0
Groaned at 0 Times in 0 Posts
(Thread Starter)
Not Ranked  0 score     
Default

Yeah sorry about not having pics, I only had a limited amount of time to get it done.

Originally Posted by TiGraySpeed6 View Post
Respectable post for a noob brownie!
Originally Posted by 06Speed6 View Post
Nice 2nd post, if only everyone could make a 2nd post this good.
Thanks!

I figured that I got enough info from everybody else on this site I owed it to at least give my 2 cents.
tkephart is offline   Reply With Quote
The Following User Says Thank You to tkephart For This Useful Post:
06Speed6 (12-28-2011)
Reply


Currently Active Users Viewing This Thread: 1 (0 members and 1 guests)
 

Posting Rules
You may not post new threads
You may not post replies
You may not post attachments
You may not edit your posts

BB code is On
Smilies are On
[IMG] code is On
HTML code is Off
Trackbacks are On
Pingbacks are On
Refbacks are On


Similar Threads
Thread Thread Starter Forum Replies Last Post
My observations and progress MS309 2010 MS3 - ECU Computer Tuning 12 08-26-2011 03:40 PM
Two weeks old and observations Simoli Mazdaspeed3/6 General Discussion 22 01-02-2011 09:51 AM


All times are GMT -7. The time now is 03:14 PM.
Powered by vBulletin® Version 3.8.6
Copyright ©2000 - 2020, Jelsoft Enterprises Ltd.
SEO by vBSEO ©2011, Crawlability, Inc.
vB.Sponsors
Template-Modifications by TMS
©Copyright 2008 ; 2019 Cymru Internet Services LLC | FYHN™ Autosports HQ
Ad Management plugin by RedTyger
Page generated in 0.35143 seconds with 26 queries