
|
 |  |  |  |  |  |
 |
| |||||||
|
Welcome to Mazdaspeed Forums . You are currently viewing our boards as a guest which gives you limited access to view most discussions and access our other features. By joining our free community you will have access to post topics, communicate privately with other members (PM), respond to polls, upload content and access many other special features. Registration is fast, simple and absolutely free so please, join our community today! If you have any problems with the registration process or your account login, please contact contact us. *When you join MSF as a registered user, there will be No Ads. *Registered Members get access to the Off Topic Area of the Forum *Registered Members have an opportunity to upgrade their accounts to VIP, which brings a host of goddies for supporting MSF such as Raffles, Additional Forum Access, More PM Storage, The ability to upload more Images and many other enhancements. *Registered members also get access to the live chat box! |
| | | LinkBack | Thread Tools | Search this Thread | Display Modes |
| |
 |  05-20-2015, 07:04 PM
| #1 |  |
 Join Date: Jul 2013 Location: Pendleton, OR
Posts: 80
(View Stats)
iTrader: (0)
Rep Power: 0   Thanks: 65
Thanked 44 Times in 16 Posts
Groans: 1
Groaned at 1 Time in 1 Post
(Thread Starter) |   Not Ranked : 0 score Not Ranked : 0 score This was done on my 2013 Genpu with Tech Package, will work on 2012 with tech, not sure about earlier. Things you will need... You donât necessarily NEED these but they seriously make this a breeze, and itâs clean af. I will include instructions for doing it without these items as well. x6 I have chosen to hardwire my CBT into the wire harness behind the instrument panel, as it seems to be the easiest and cleanest way to wire it in. (Huge thanks to Derek for the pinouts and documentation on his website www.canb.us. Saved me so much time and frustration) First thingâs first, take the instrument panel out. 1. Release the steering wheel adjustment lever and push your steering column all the way down and pull it as far out toward you as it will go. 2. Press down on the back corners of the rubber boot on top of the steering column to expose two phillips screws that you must remove. One on the left, and one on the right. Donât drop the god damn screws! 3. The remainder of the instrument panel is fastened with plastic clips that will simply pop out if you pull the entire panel straight toward you. 4. You should now be able to remove the wire harness that attaches to the instrument panel, and it should come right out. Wire in the CBT harness NOTE: Because we will be physically adding our node to the CAN bus by cutting into it, we need to enable the termination resistors on the CANBus Triple. This maintains noise immunity on the CAN network by adding the resistor to the connections between CAN High and Low. If you want to know more about why this is necessary check out the Wikipedia article on CAN Bus Networks ( ), particularly about Architecture and Layers. Just place a drop of solder on the jumper terminals labeled Term1 and Term3 (not needed on 2). *If you do not enable the resistors, you are going to cause an interruption in your CAN network and nothing will communicate correctly when your CANBus Triple is connected. (i.e. shit will freak out) You can also wire a 120 Ohm resistor between CAN High and CAN low on either end of the wires we cut (Shown below). Using the resistors on the CBT is a better way to go as this makes it super easy to remove the CBT, plug in a jumper to our ribbon cable and be back to stock functionality. The wires we will be tapping into and their corresponding functions are listed below: 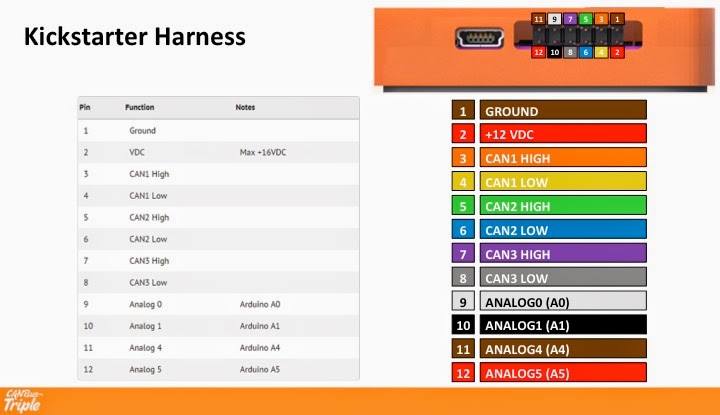 Above Image Credit - Derek @ www.canb.us Fuse panel location 1. (POWER) Red will connect to the fuse panel on the driver side with the Add-A-Circuit. There are two spots you can wire this in. If you do not have one, you can wrap the wire around one of the ends of the fuse and put the fuse back in. 2. (GROUND) Black will ground to the chassis via the bolt inside the same fuse panel. I have used a ring connector to make it easier to remove and re-attach the wire if need be. It also works just as well to strip a good chunk of shielding from the wire, wrap it around the bolt and tighten it back down. 3. (Analog 0 & 1) These two wires are in the large bundle behind the instrument panel. They are Brown and Sky Blue (both with two grey stripes). Brown will connect to the White wire in our ribbon cable, and Sky Blue will connect to the Black wire in the ribbon cable. 4. (CAN 2) Also behind the instrument panel, but this time in the bundle of wires that plugs into the gauge cluster, the White and Red wires (both with 1 stripe this time) will connect to CAN2 on our CBT. White will connect to the Green wire and Red will connect to the Blue. 5. (CAN 1 & CAN 3) This is where we are physically separating the CAN network. Cut the Grey and Green twisted pair (they are literally twisted together) in half. -On the left side of our cut, we are going to wire the Grey wire to the Yellow one in our ribbon cable, and the Green wire will connect to Orange. -On the right side of our cut, we are going to wire the Grey wire to the Purple one in our ribbon cable, and the Green wire will connect to Grey. 6. Tuck the wires back in nicely, and put your dash back together because you are done. For easy access, I have put my CBT unit in the storage where your OBDII port is. Pop out your OBD port and run the ribbon cable into the storage area, and that is where my unit sits. I previously popped the OBD port out and have a bluetooth adapter plugged in that sits behind the dash, so this was not a problem for me. |

| |
|
05-21-2015, 07:01 AM
| #2 | |
| Join Date: Dec 2009 Location: South Jersey
Posts: 99
(View Stats)
iTrader: (0)
Rep Power: 0 Thanks: 18
Thanked 44 Times in 29 Posts
Groans: 0
Groaned at 0 Times in 0 Posts
| Not Ranked : 0 score Pardon my ignorance, but what do you intend to monitor or change with this? Instrument panel, lighting, radio, HVAC?
__________________ 09 CWP MS3 AP V3, AT HPFP, CPE DP SRI TIP & RMM, Forge V2 BPV, JBR SSP & DMM & PMM 3 port EBCS, Damond OCC, TR8 FMIC Bilstein struts, Moog endlinks, Energy Suspension swabar bushings |
|
| |
|
05-21-2015, 07:13 AM
| #3 | |
| Join Date: May 2010 Location: Benton, AR
Posts: 1,877
(View Stats)
iTrader: (6)
Rep Power: 0 Thanks: 1,028
Thanked 1,654 Times in 805 Posts
Groans: 0
Groaned at 5 Times in 5 Posts
| Not Ranked : 0 score
__________________ 2010 Mazdaspeed 3 Liquid Silver Metallic HTA 3076 | HTP 4" Intake, battery tray, under mount piping | CPE Exhaust Manifold, downpipe, FMIC & Stage 2 RMM | MD TMM and PMM | Tial MV-R ewg w/ Kozmic dump tube | VCTS delete/Ported IM | JBR OCC, EGR delete, BSD w/ oil pan baffle & RSB | SP63 Oil Cap Breather | Synapse SB BPV | UR CBE | Autotech HPFP | H & R Coilovers | Whiteline Endlinks | Manley Pistons & Rods | L19 Head Studs | Kozmic 6th Port w/ DW65c ITFP | Snow Performance Stg 2 Meth | JMF Manifold | SouthBend Stg 3 Endurance Clutch | Tuned with  | |
|
| |
|
05-21-2015, 09:47 AM
| #4 | |
| Join Date: Dec 2009 Location: South Jersey
Posts: 99
(View Stats)
iTrader: (0)
Rep Power: 0 Thanks: 18
Thanked 44 Times in 29 Posts
Groans: 0
Groaned at 0 Times in 0 Posts
| Not Ranked : 0 score I'm a computer moron. You could set TPMS alarm sound to go off for KR, AFR, BAT? I can monitor engine PIDs through AP or Torque app. Could you force SWAS disable with traction control button? Reverse lights on when you unlock car like GM? I'm not sure what systems are on CANbus and what are just simple circuits or separate communcation.
__________________ 09 CWP MS3 AP V3, AT HPFP, CPE DP SRI TIP & RMM, Forge V2 BPV, JBR SSP & DMM & PMM 3 port EBCS, Damond OCC, TR8 FMIC Bilstein struts, Moog endlinks, Energy Suspension swabar bushings |
|
| |
|
05-21-2015, 10:34 AM
| #5 | |
| Join Date: May 2010 Location: Benton, AR
Posts: 1,877
(View Stats)
iTrader: (6)
Rep Power: 0 Thanks: 1,028
Thanked 1,654 Times in 805 Posts
Groans: 0
Groaned at 5 Times in 5 Posts
| Not Ranked : 0 score It would probably be much easier if you hit up the CBT forums to see what everyone is doing.
__________________ 2010 Mazdaspeed 3 Liquid Silver Metallic HTA 3076 | HTP 4" Intake, battery tray, under mount piping | CPE Exhaust Manifold, downpipe, FMIC & Stage 2 RMM | MD TMM and PMM | Tial MV-R ewg w/ Kozmic dump tube | VCTS delete/Ported IM | JBR OCC, EGR delete, BSD w/ oil pan baffle & RSB | SP63 Oil Cap Breather | Synapse SB BPV | UR CBE | Autotech HPFP | H & R Coilovers | Whiteline Endlinks | Manley Pistons & Rods | L19 Head Studs | Kozmic 6th Port w/ DW65c ITFP | Snow Performance Stg 2 Meth | JMF Manifold | SouthBend Stg 3 Endurance Clutch | Tuned with |
|
| |
|
05-21-2015, 04:31 PM
| #6 | |
| Join Date: Jul 2013 Location: Pendleton, OR
Posts: 80
(View Stats)
iTrader: (0)
Rep Power: 0 Thanks: 65
Thanked 44 Times in 16 Posts
Groans: 1
Groaned at 1 Time in 1 Post
(Thread Starter) | Not Ranked : 0 score This is just one way to set this up. It can sit between literally just about any bus in your vehicle you want. Here are a couple videos, one from The Duke here on msf. This little unit is only as powerful as the ideas you throw at it https://m.youtube.com/watch?v=tj0AsuT4f8g https://m.youtube.com/watch?v=2bSiRKTtazo Because this thing has multiple digital and analog input/outputs you can control tons of other shit. Like external displays etc. P.S. I am absolutely going to hook this up to the TC button to disable SWAS. Fuck SWAS.... |
|
| |
|
05-22-2015, 06:41 AM
| #7 | |
| 6 mods and some Kool-Aid  Join Date: Mar 2008 Location: Jax, FL
Posts: 28,879
(View Stats)
iTrader: (12)
Rep Power: 28977 Thanks: 20,271
Thanked 57,013 Times in 14,591 Posts
Groans: 856
Groaned at 183 Times in 156 Posts
| Not Ranked : 0 score Discuss here: CANBus Triple Installation - Mazdaspeed Forums |
|
| |
| The Following User Says Thank You to Raider For This Useful Post: | jcolton (05-22-2015) |
| Currently Active Users Viewing This Thread: 1 (0 members and 1 guests) | |
| |
 Similar Threads
 | ||||
| Thread | Thread Starter | Forum | Replies | Last Post |
| CANBus Triple Installation | jcolton | 2010 MS3 - How-To's | 21 | 11-21-2015 10:22 AM |
| Triple the pleasure... Triple the fun | Sid3wayS | Gen2 MS3 General Discussion | 35 | 01-13-2014 01:42 PM |
| MBC Installation How To | Ghetto Mods | MazdaSpeed 3/6 - Turbo Induction | 6 | 04-25-2008 07:49 PM |


 Hybrid Mode


